How to Brown Butter
Browned butter adds an incredible depth to baked goods. Try it in cookies, cakes, and muffins for a delightful twist.
Servings: 1
Equipment
- Light colored Heavy-bottomed saucepan
- Wooden spoon or wire whisk
- Fine mesh strainer
- Heatproof bowl
Ingredients
- 2 cups unsalted butter, equivalent to 4 standard sticks
Instructions
- Cut the unsalted butter into tablespoon-sized chunks. This allows for even melting.
- Place the butter chunks in the saucepan and set the heat to medium.
- As the butter melts, it will start to foam. This is due to the water content evaporating. Stir occasionally to ensure even heating.
- Once the foaming subsides, the butterfat solids at the bottom will begin to turn a beautiful golden brown. The aroma will become nutty and inviting. This process usually takes about 5-7 minutes, so keep an eye on it.
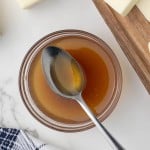
- Once the butter reaches your desired amber hue, immediately remove it from the heat and pour in to a heat safe bowl to prevent burning.
- Carefully strain the browned butter through the fine mesh strainer, This will remove any darkened solids.
- Let the browned butter cool slightly before using it in your recipes. You can store it in an airtight container in the fridge for up to two weeks. Use it as a drizzle over roasted vegetables, a base for sauces, or to upgrade your baked goods.
Notes
- Browned butter adds an incredible depth to baked goods. Try it in cookies, cakes, and muffins for a delightful twist.
- If you are making your own brown butter swaps in baking (it's not called for in the recipe, you just want to use it), then add an extra tablespoon of butter to the pan per each half cups of butter needed to account for some of the volume loss when preparing the brown butter. So if you want to swap 1/2 cup of normal butter for 1/2 cups of brown butter in a recipe, cook 1/2 cup AND 1 tablespoon of butter into brown butter.
- If the recipes calls for brown butter you won't need to do this because they will have adjusted the recipe to suit the amount of brown butter in the recipe.
- I often don't strain the darkened milk solids in the brown butter. I like how they look and how they taste so you can see what your opinion is.
Nutrition
Serving: 2cups | Calories: 3255kcal | Carbohydrates: 0.3g | Protein: 4g | Fat: 368g | Saturated Fat: 233g | Polyunsaturated Fat: 14g | Monounsaturated Fat: 95g | Trans Fat: 15g | Cholesterol: 976mg | Sodium: 50mg | Potassium: 109mg | Sugar: 0.3g | Vitamin A: 11345IU | Calcium: 109mg | Iron: 0.1mg
QR code
Scan this QR code with your phone's camera to view this recipe on your mobile device.
