Gingerbread House Recipe
I'm sharing my family's homemade Gingerbread House Recipe, plus a template for making festive holiday decorations! Making DIY gingerbread houses is a much loved holiday tradition and a perfect activity to bring friends and family together this season.
Servings: 1 small house
Ingredients
For the gingerbread house:
- 1/2 cup butter melted
- 3/4 cup brown sugar
- 1 large egg
- 1/4 cup molasses
- 2 2/3 cups flour
- 2 teaspoons ground ginger
- 1 teaspoon baking soda
- 1/2 teaspoon ground cinnamon
- 1/2 teaspoon ground nutmeg
- 1/2 teaspoon ground allspice
- 1/2 teaspoon salt
For the royal icing:
- 8 cups powdered sugar confectioner's sugar (2 pound bag)
- 6 tablespoons meringue powder see notes for using egg whites instead of meringue powder
- 10-15 tablespoons water
For decorating:
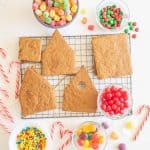
- assorted candies, cereal, pretzels, sprinkles, optional (here are the best candy for gingerbread houses) (you can just use royal icing for decorating too)
Instructions
To make your gingerbread house dough and pieces:
- Download and print the gingerbread house patterns. Cut out the shapes.
- To make the large gingerbread house you'll need 3 batches of this dough recipe and for the smaller house you'll need a single batch of this recipe (the recipe as written).
- Preheat the oven to 360° F (a little hotter than 350° F helps the gingerbread to be crisper and sturdier).
- In a large bowl beat together the butter and brown sugar until light and fluffy, about 2 minutes.
- Add the egg and molasses and beat to combine.
- Add the flour, ginger, baking soda, cinnamon, nutmeg, allspice, and salt and mix until well incorporated. The mixture will be crumbly.
- Dump the crumbly dough into the center of a 15 by 11 inch piece of parchment paper.
- Use your hands and a rolling pin to press and roll the dough into a 13.5 by 10 inch rectangle. I normally start by pressing the dough with my hands, then rolling it out with a rolling pin. I'll use a flat edge spatula or a bench scraper to cut extra long edges into more of a rectangle and I'll press the pieces that I cut into spaces that need more dough. Once you do it a time or two you get the hang of it! Take your time here to get a nice rectangle, it's ok to cut and patch the rectangle together, just roll it smooth.
- Gently lift opposite edges of the parchment paper and set it on a rimmed baking sheet.
- Bake the slab of gingerbread for 20 minutes.
- Remove from the oven and let cool 3-4 minutes.
- While still warm cut, place your paper pattern on top of the warm cookies slab and cut out the desired shapes using a small paring knife.
- Carefully remove the extra "scraps" of gingerbread around the pieces you just cut (save them to eat them, they are delicious!). If any of your house pieces need a little more trimming so they have straight edges, so that now.
- Return the gingerbread house pieces to the oven and bake for an additional 10 minutes.
- Remove from the oven and allow to cool fully before assembling.
To make your royal icing:
- While your gingerbread house pieces are cooling, make your royal icing.
- Add your powdered sugar and meringue powder to a large mixing bowl. Add 10 tablespoons of water to the bowl.
- Use a stand mixer or a hand mixer to beat until well incorporated. If the icing is very crumbly, add more water, 1 tablespoon at a time until it creates a thick but smooth icing. I normally end up adding 4 more tablespoons of water and sometimes the full 5, it'll depend on how you measured your powdered sugar though.
- Beat until the icing is shiny, about 6-8 minutes with a stand mixer and 8-10 minutes with with a hand mixture.
- The icing should be thick but not so thick you can't stir it with a spoon. Adjust the constancy as needed.
- When you aren't working with your royal icing place a clean wet dish towel over the top of the icing so that it doesn't start to harden. You can also press a piece of plastic wrap against the top of the icing.
To assemble your gingerbread house:
- To put your house together get a flat surface like a cake board, cutting board, or cookie sheet. Put about 2 cups of your royal icing in a piping bag or a good quality freezer zipper-topped plastic bag. Use a frosting tip that is about ½ inch wide circle or cut about ½ inch off the tip of one corner of your baggie. Take the end of a gingerbread house (one of the pointed end pieces) and pipe a thick line of icing along the bottom.
- Set it on your board where you want it to be and use tin cans to help support it.
- Pipe a thick line of icing on three sides (two short and one long side) of a side wall piece of the house.
- Place that piece on the inside of one side of the end house piece (take a look at where it hits the house, it's on the inside of the end piece and you don't see the edge of the wall, this is the easiest way to make the house stable.
- Pipe a thick layer of icing on the bottom of the other end other house and place it against the wall you just sat down.
- Pipe a thick layer of icing on three sides of the second wall piece and put it in between the front and back of the house, opposite of the other wall. Use cans to help support the structure as needed and let this much of the assembled house sit for 15 minutes to allow the icing time to harden.
- After your 15 minutes of waiting, pipe a thick layer of royal icing along the top of the walls and the angles of the roof.
- Add a thick layer of icing to one edge of one piece of roof (the wide edge), this will be where the roof comes to a point and touches the other piece of roof at the top ridge line of the roof. Place both pieces of the roof on top where they go and gently press into place. Use cans to support the roof as needed. Let the house dry for at least 30 minutes before decorating.
To decorate your gingerbread house:
- I like to move to a smaller icing tip or place more icing in another baggie and cut a smaller tip in the bag. You don't need as much icing to decorate.
- You can use just icing to decorate, or you can use candies. This is the fun part! Place your candies out in little bowls (or in the sections of a muffin tin) and place things where you would like. You can use things like pretzels, gum, cereal, and more too. The sky is the limit when it comes to decorating your house. Enjoy the process and be creative!
- One you have added your candy, let the house dry another 30 or so minutes and it's done! You can eat it within a few days (or even weeks, the cookie just gets hard), or you can keep it all season and enjoy the beauty.
Notes
- I think cutting the cookie pieces out of the cooked slab of gingerbread makes for a much sturdier and much easier to assemble house. Getting your slab nice and even might take a few minutes but it's worth the effort! The house pieces are thicker, they don't spread while baking, your edges are nice and straight and stay that way. I'm here to convince you to go with this method because it is the best!
- Those "scrap" pieces of gingerbread are your little gift for making the house, eat them up like cookies hot off the pan or dip them in milk when they get a little harder once cooled.
- I often make gingerbread houses over multiple days. I'll do all of my dough making, baking, and cutting my pieces on one day. Assemble the house and decorate another day. It takes a lot of time for all of the steps but that's half the fun.
- When making the royal icing you can have NO LEFTOVER GREASE in your bowl. Make sure your bowls, spoons, and icing bags are totally free from grease. That fat keeps the icing from coming together and will ruin the batch.
Nutrition
Serving: 1 small house | Calories: 4852kcal | Carbohydrates: 963g | Protein: 42g | Fat: 100g | Saturated Fat: 61g | Polyunsaturated Fat: 6g | Monounsaturated Fat: 26g | Trans Fat: 4g | Cholesterol: 408mg | Sodium: 3153mg | Potassium: 1975mg | Fiber: 11g | Sugar: 694g | Vitamin A: 3085IU | Vitamin C: 0.5mg | Calcium: 445mg | Iron: 23mg
QR code
Scan this QR code with your phone's camera to view this recipe on your mobile device.
