Classic French Baguette Recipe
on Feb 15, 2022, Updated Oct 29, 2024
This post may contain affiliate links. Please read our disclosure policy.
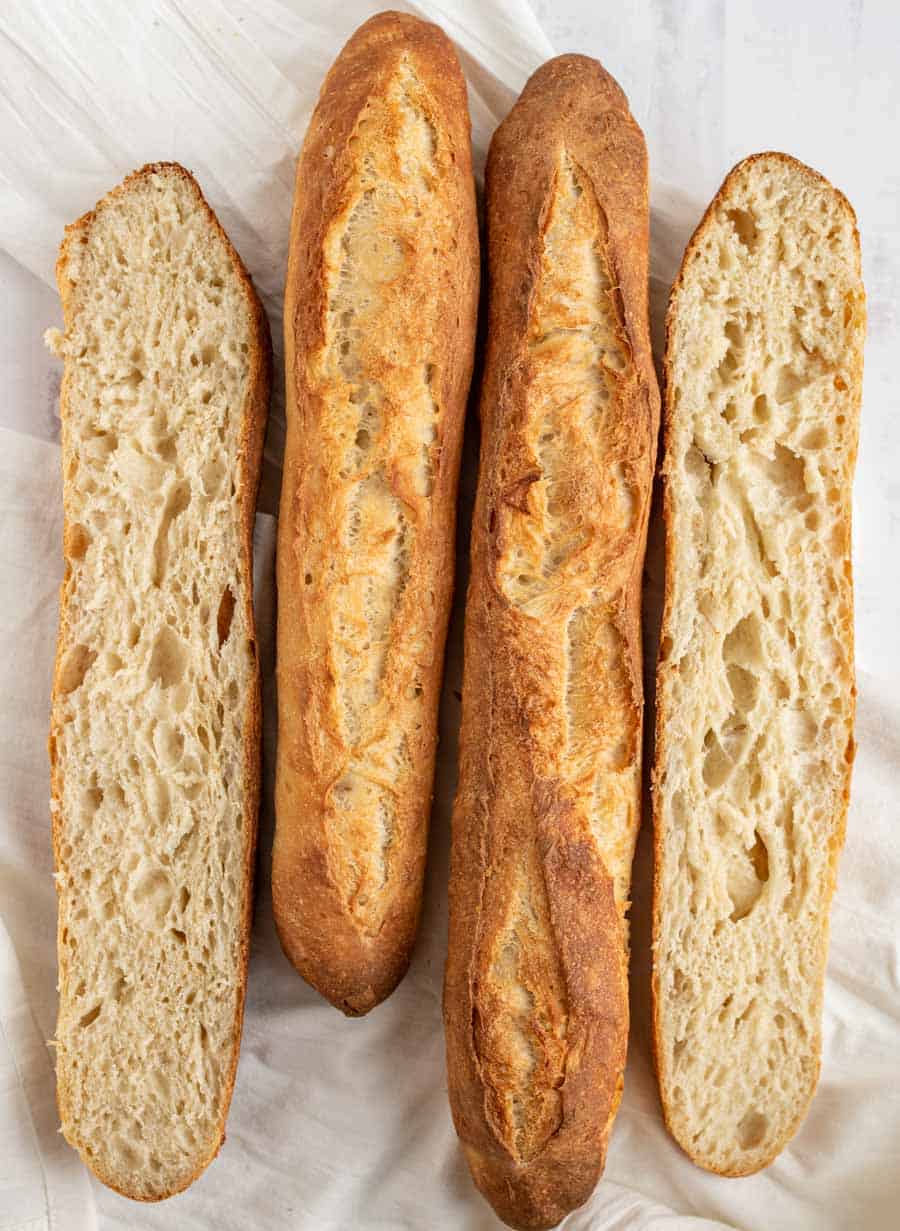
This Classic French Baguette Recipe has been my ultimate baguette-making experience so far! They take some time to make but are pretty simple. You will love having mastered the skill of making authentic French Baguettes at home!

The perfect baguette is crispy on the outside, perfectly chewy on the inside, has a complex flavor, and is one of those breads that feel like such a simple pleasure in life. The ingredient list is short, but the flavor is amazing. They are a perfect base for my tomato bruschetta!
This Classic French Baguette Recipe looks a bit time consuming, but it really is basic, I promise. If you’re new to bread baking, you might want to check out more info on how to make homemade bread or try out this easy French bread recipe.
Table of Contents

Why You’ll Love This Recipe
- So Tasty: The fermentation process and the simple ingredients create a unique taste that many people find irresistible.
- Crispy & Chewy: The combination of a crispy crust and a soft, chewy interior makes baguettes satisfying to eat.
- Pantry Staples: Baguettes are made with just a few basic ingredients you should already have at home.
Recipe Ingredients
- Flour – All-purpose
- Instant Yeast – Also called rapid rise or quick rise yeast
- Salt
- Honey
See the recipe card below for full information on ingredients and quantities
How To Make Classic French Baguettes
- Combine water, honey, yeast, flour, and salt in a bowl. Stir until just combined.
- Cover and let the dough rest for 30 minutes, then perform a series of stretch and folds over the next 2-3 hours.
- Cover the dough and refrigerate for 12-18 hours.
- Divide, shape the dough into loaves, let rise, and bake at 450°F for 24-28 minutes.

How To Stretch and Fold Your Dough
First, you’ll mix up your dough; it comes together really easily just by stirring it with a wooden spoon. Then, over the next 3 or so hours, you’ll “stretch and fold” your dough every 30 to 45 minutes or so for a total of 4 times.
Don’t overthink this part, the timing isn’t a huge deal, so don’t sweat it if you do it a little more or less and a little faster or slower than at the 30 to 45 minute mark. The idea is that you knead the dough just a bit, a few times, over the course of a couple of hours. It’s way flexible. This helps to make the inside of your baguette perfectly chewy.
When I say “stretch and fold,” here’s what you do: Put your hand between the dough and the bowl on one side and grab the dough, gently pull it up to give it a good stretch (if the dough starts to break, stop pulling, you are just stretching the dough as far as it wants to stretch without breaking it) and then fold it back down into the middle of the bowl.
Give the bowl a quarter turn and repeat the process, working your way around the bowl. I normally think of the bowl as a square and stretch and pull the dough 4 times, once on each side of my square. It’ll take 15 or so seconds to do this.
Do this a few times over the next few hours. Then, cover up the bowl well with a beeswax wrap or a piece of plastic wrap and put it in the fridge for the next 12-18 hours.
After your dough has chilled for 12-18 hours, remove it from the bowl and divide it into three even pieces.
Pat the pieces of dough out into rectangles (don’t worry too much about the shape, the cold dough is pretty stiff, just pat it out) and are about 1 inch thick. Cover with a towel and let rise for 1 hour.
Recipe FAQs
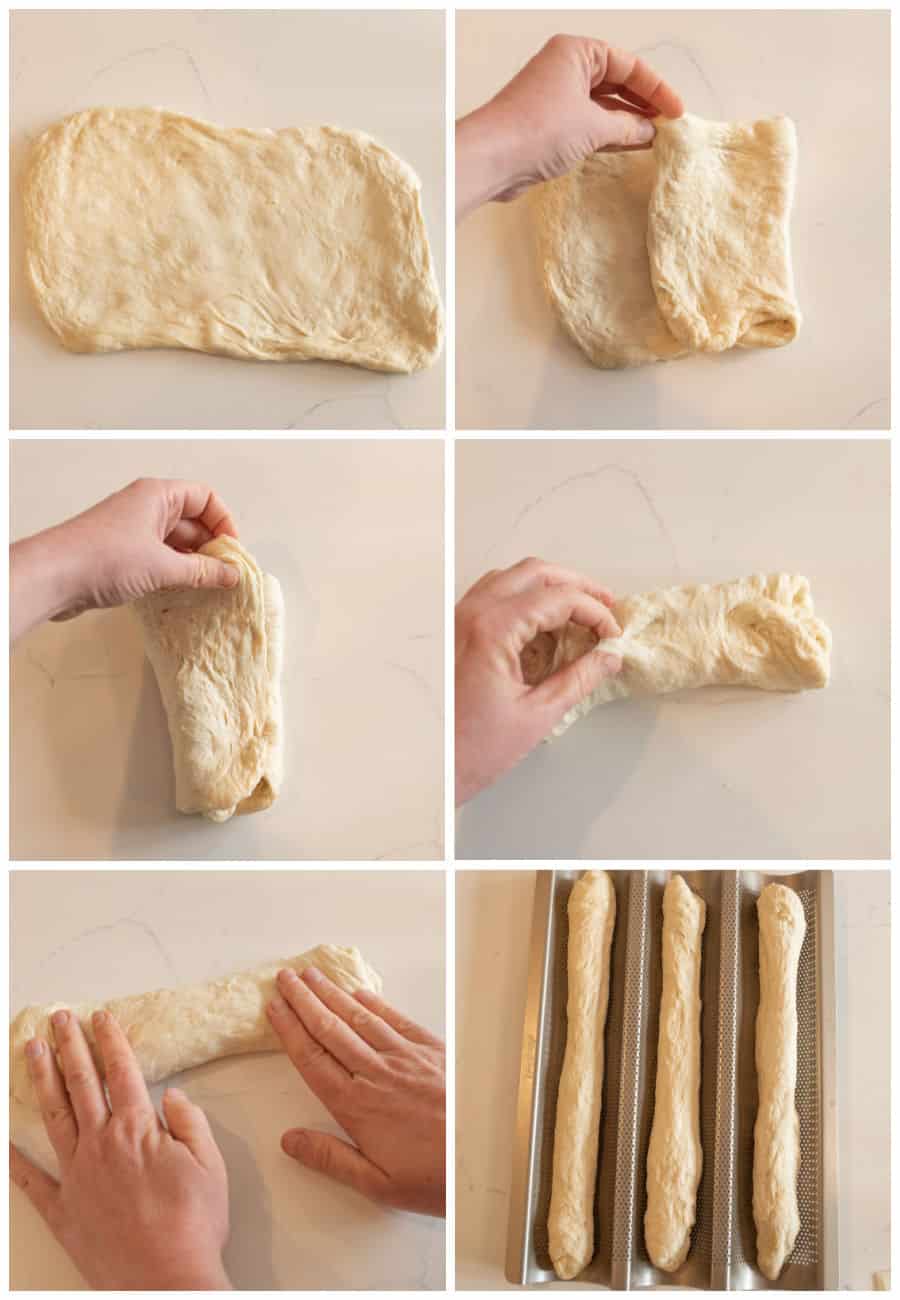
Once the dough has rested at room temperature for an hour, pull it into a rectangle that is about 11 inches by 8 inches. Then, fold the dough into thirds, as shown in the pictures above. Once the dough has been folded, pinch the seem shut.
Gently use your hands to roll the dough log out into a baguette that is 15 inches long. Use your hands and the rolling motion to taper the ends gently. Then, place the baguettes in a baguette pan. Repeat with the remaining dough. Let the dough rise for about an hour in the baguette pan, and then bake!
While a stand mixer with a dough hook can make kneading easier, you can also knead the dough by hand.
Baguettes are best enjoyed fresh on the day they are baked. To store them, wrap them tightly in a kitchen towel or paper bag to prevent them from getting too soft. Avoid storing them in plastic bags, as this can make the crust lose its crispness.
The outside texture is achieved by cooking the dough at a very high temperature AND by adding a pan of water to the oven so that it creates steam. The steamy cooking environment mixed with the high temperature are the things that make perfect baguettes.
By using a slow fermentation process for this dough, you develop the flavor of the dough. After the dough has been made and you’ve kneaded it a few times over a few hours, you’ll cover it well and pop it in the fridge for 12 to 18 hours (depending on your time schedule). This method of cold retarding the dough is where so much of the magic is made. This slow rise is also changing the texture of the dough! So it’s a double win.

Special Equipment Needed
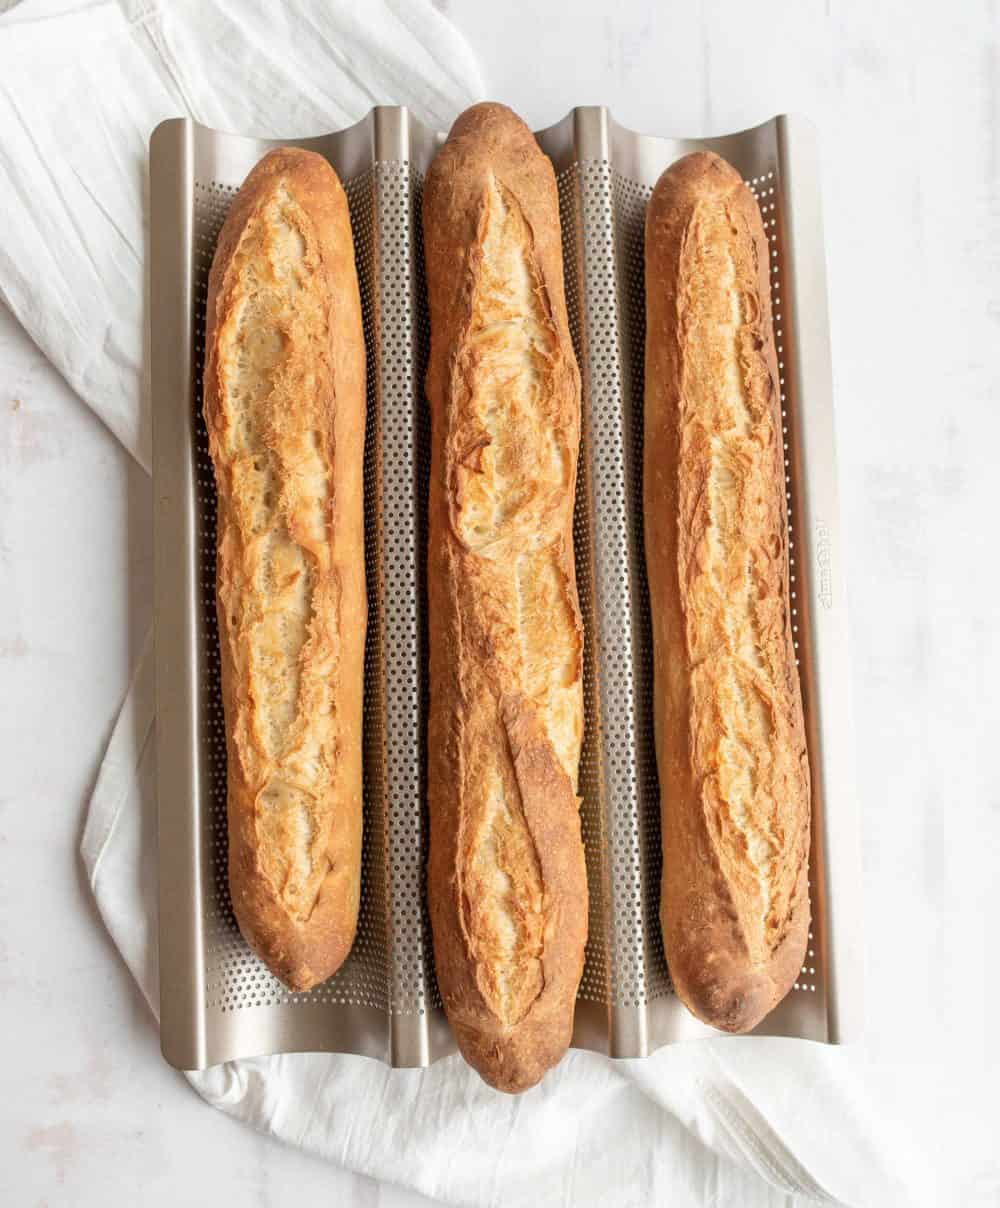
After much trial and error, though, I did decide that buying a baguette pan was worth it. The bread rises right in the pan, and the pan goes right in the oven. It doesn’t take up a lot of room to store and I’ve liked the results. The pans aren’t expensive either.
You’ll need a razor blade or a bread-slashing tool called a lame. You can use a very sharp serrated knife to cut the slits in your bread before baking, but I’ve found a razor blade or lame just to work so much better. It will cut deeply without tearing the bread or roughing it up too much (you can deflate the risen dough by using a knife that doesn’t cut well for scoring).

Expert Tips
- Weight, Not Measure: I like using a scale to measure ingredients for this recipe, the more I use a scale for baking the more I love it. It’s a lot more consistent!
- Make Extra: You can double this recipe, it works great. I always make a double batch for my family. I like to bake the pans separately though (they bake up better one pan at a time in my oven).
- Baguette Pans: You can find lots of baguette pans online. I like the ones that are carbon steel and this is the one that I bought.
- Scoring Tool: You’ll want to use a razor blade or lame for slashing your bread before baking. A lame is just a razor blade on a stick but you might like the feel of it better. This tool is also used for scoring sourdough bread.

How to Serve and Store Classic French Baguettes
Baguettes are a perfect addition to a cheese platter or alongside a bowl of chicken noodle soup, butternut squash soup, or vegetable soup. They can complement a fresh, green salad dressed in one of my 9 homemade salad dressings. Baguettes are also perfect for soaking up sauces from dishes like spaghetti or sausage and pumpkin pasta.
Wrap uneaten baguettes tightly in a kitchen towel or paper bag for up to 2 days to prevent them from getting too soft. Avoid storing them in plastic bags, as this can make the crust lose its crispness.
To reheat, wrap the baguette in foil and warm in a 350°F oven for 15 minutes.
For longer storage, freeze baguettes by wrapping them in foil and placing them in a freezer-safe bag. Freeze for up to 3 months. Thaw at room temperature and reheat before serving.
More Yeasted Bread Recipes to Consider
Snacks
Big Soft Pretzels
Homemade Bread
100% Whole Wheat Bread Recipe
Easy Appetizers
Bosco Sticks Recipe
Did you make this recipe? Leave a ⭐️ review and share it on Instagram, Facebook, or Pinterest!

Classic French Baguette Recipe
Equipment
- medium mixing bowl I love these because they have lids and double as serving bowls.
- kitchen towel I love the off-white color of these kitchen towels. They wash up great and are even large enough to cover full sheet pans.
- baguette pan I own 3 of those and make tons of baguettes way too often!
Ingredients
- 1 1/2 cups + 2 tablespoons cool water, 370 grams
- 1 tablespoon honey, 25 grams
- 1 teaspoon instant yeast, 3 grams
- 3 1/2 cups all-purpose Bob’s Red Mill or King Arthur Flour brand flour, 500 grams
- 2 teaspoon fine sea salt, 10 grams
Instructions
- In a medium mixing bowl add the water and honey to the bowl and stir to combine.
- Add the yeast, flour, and salt to the bowl and use a wooden spoon to mix well. The dough will be thick, just stir it as well as you can until the flour is incorporated. No need to mix a lot by hand at this point, just get it to come together.
- Cover the bowl (use a lid, beeswax wrap, or some good cling wrap) and let the dough rest for 30 minutes.
- After 30 or so minutes stretch and fold the dough. When I say “stretch and fold”, here’s what you do: put your hand between the dough and the bowl on one side and grab the dough, gently pull it up to give it a good stretch (if the dough starts to break, stop pulling, your are just stretching the dough as far as it wants to stretch without breaking it) and then fold it back down into the middle of the bowl. Give the bowl a quarter turn and repeat the process, working your way around the bowl. I normally think of the bowl as a square and stretch and pull the dough 4 times, once on each side of my square. It’ll take 15 or so seconds to do this.
- Over the next 2-3 hours, every 30 to 45 minutes, do a stretch and fold with the dough. Be sure to cover the dough well after each session. Do around 4 stretch and fold sessions total (a little more won’t hurt anything).
- See the bakers schedule in the post for more information on how and when I do this (I normally make my dough while I’m making dinner and stretch and fold throughout the evening).
- After you have stretched and folded the dough, cover the dough well and place it in the fridge for the next 12-18 hours.
- You have some flexibility about how long the dough is in the fridge, so feel free to make the baking schedule work with your schedule. I adjust the next days baking depending on when we want to eat the baguettes. If they are for lunch, I’ll get the dough out of the fridge 3 hours before we want to eat lunch. If I want them for dinner, I’ll get the dough out 3 hours before dinner. If do don’t have a set time you want to eat them, you can just do these next steps when you have about a three hour chunk of time to dedicate to it (not all hands-on time but you’ll need to be around for things).
- Remove the dough from the fridge after it’s 12 to 18 hour rest, and remove it from the bowl.
- Divide the dough into three even pieces.
- Gently press each piece of dough into a rectangular shape about 1 inch thick. If the dough is very sticky feel free to lightly flour your surface. Cover the pressed out dough pieces with a clean dish towel and allow to rise for 1 hour.
- After the dough has rest for an hour at room temperature, it’s time to shape your loaves. Working with one piece of dough, stretch the dough gently so that it makes a rectangle that is roughly 11 inches by 8 inches. Fold one third of the dough to the middle of the rectangle, fold the other side of the rectangle into the middle of the dough (like you are folding a letter) and then pinch the dough together along the seem to make a log (I have step by step photos of this in the blog post).
- Use both of your hands to gently roll the dough out into a 15 inch long log, tapering the ends just a bit with your hands.
- Place the prepared dough log into your baguette pan.
- Repeat with remaining dough.
- Cover the dough in the pan with a clean dish towel and let rise for 45 minutes to 1 hour or until the dough is light and puffy (it won’t be quite doubled in size).
- While the dough is rising, preheat your oven to 500 degrees F. When you turn the oven on to preheat, add a small dish of water to the oven. I like to use a bread pan that has about 2 inches of water in it. I put it off to one side of the oven so that my baguette pan can fit next to it. I like to let the oven and water preheat for at least 30 minutes so that it has time to get good and hot.
- When the bread has finished rising in the baguette pan, use a razor blade or lame to cut 3 diagonal slashes 1/2 inch deep diagonally across each loaf OR cut one long 1/2 inch deep slash down the center of each loaf (I like the center slit personally).
- Place the bread in the hot oven, being careful when you open the oven as it is hot and steamy.
- Close the oven door and reduce the heat to 450 degrees F. right away.
- Let the baguettes cook until they are deep golden brown, 24-28 minutes (I like 25 minutes on the dot). They are going to be very golden!
- Remove the baguettes from the oven and allow to cool 10-15 minutes before serving warm.
- Baguettes are also delicious at room temperature but we have found that we like them eaten fresh they day they are made.
- Uneaten baguettes can be stored wrapped in a clean towel and make excellent bread for sandwiches. They also reheat well by wrapping them in foil and letting them warm in a 350 degree oven for 15 minutes.
Video
Notes
- I like using a scale for this recipe and measuring that way, the more I use a scale for baking the more I love it. It’s a lot more consistent! You can totally use your stand mixer for this.
- Sometimes I’ll make my dough in the stand mixer and just let it hang out in there for the next few hours. I’ll cover the whole things lightly with a towel and then for my stretch and fold sessions, I’ll simple turn the mixer on for 15 seconds and let it do the kneading. It works great!
- You can find lots of baguette pans online. I like the ones that are carbon steel and this is the one that I bought. You’ll want to use a razor blade or lame for slashing your bread before baking, a lame is just a razor blade on a stick but you might like the feel of it better… this tool is also used for scoring sourdough bread.
- If you don’t want to buy the baguette pans, I thought the King Arthur Flour baguette recipe did a good job of explaining how to use the cloth, peel, and a baking stone! I bet you could look up some videos on YouTube too.


Finally, a great baguette recipe. Thank you! My husband and I have been so disappointed trying out different baguette recipes, and they turn out like regular white bread. This recipe was beautifully crunchy on the outside, and soft and chewy on the inside. I sprinkled the tops of my baguettes with some coarse salt before I popped them in the oven (don’t be jealous). I did mine with the kitchen aid stand and dough hook. We do not need to try any other baguette recipes.
The salt is a fabulous idea, I’m completely jealous! I’ll try that next time.
I made the baguette this morning, it turned really good, everybody likes it. Will make it again for sure. Thanks Melissa for sharing the recipe👍
Your recipe looks great snd I’ll try it. Any hints for making gluten free baguettes?
Thanks,
Terry
Gluten free is so hard because gluten is such a foundation of bread making. It’s not a skill I’ve acquired and I don’t even know resources to point you to for a baguette recipe. Sorry about that!
Thank you so much for this recipe, cannot believe it turned out so good. Have been trying my hand at baking bread and hubby says this is the best bred ever 🤗
Ps. Have tagged you on my Instapost
Yay!! Thank you so much for tagging on there AND leaving a review, that’s so so helpful!
I’m 67 and have been baking bread since I was 5. This is the best, and easiest, French bread recipe I have found. I have 4 different neighbors who purchase the flour and yeast so I can keep them happy with these baguettes. Thank you for sharing this with us!!
That’s so awesome! Thank you for leaving a comment!
I tried tris recipe yesterday. It was crunchy, golden and delicious. Thanks for sharing this. I noticed that the last 1-hour was not enough for me to raise the bread to the height I saw on the picture after cooking. Also the bread was salty after I doubled the batch and used 4 teaspoons salt. Next time I will use half of that amount or buy a standard teaspoon. Overall, this is a great recipe and the quality of this bread is far better that any bread I bought in stores so far!!! Thanks a lot for sharing!
Good observation, some of the difference in rising time will be the temperature and conditions of your kitchen, so making adjustments on your end is so helpful! I’m soglad that you are getting beautiful bread!
Perfect baguettes. Better than what I get at our local bakery! It takes a lot of time but it’s not difficult, and it’s totally worth it. I can’t wait to make these again.
I have a ton of SAF…is rapid rise really necessary?
Nope, you can use SAF in this recipe.
So thrilled i ran across this recipe!! My 12 year old daughter, who is obsessed with baguette (who’s not??), gave this a rating of 1 million out if 1-10. It’s so simple, I really appreciate the step by step photos, and plan to put into our weekly rotation. Thank you! So simple and so delicious.
thank you
I have been wanting to try to make a baguette for awhile. This recipe was super easy, and didn’t take much time for me to do (well besides waiting). I’ve already made two separate batches over the weekend… since the first one was eaten up so fast.
would love to know if the dough or baked loaves would hold up being frozen and made at a later date.
I will yield to recipe owner about freezing loaf for reuse, but I typically put bread that dries in processor and freeze to use as bread crumbs. This works great